
The Singer sewing machine is a trusted brand offering innovative sewing solutions. This manual guides users through setup, threading, and maintenance. It ensures safe operation and troubleshooting, enhancing sewing experiences.
1.1 Overview of Singer Sewing Machines
Singer sewing machines are renowned for their versatility and durability, catering to both beginners and experienced sewists. Available in various models, they offer features like automatic threading, multiple stitch options, and adjustable tension; Whether for household use or professional projects, Singer machines are designed to deliver precise stitching and reliability. This manual provides a detailed guide to understanding and utilizing your Singer sewing machine effectively, ensuring optimal performance for all your sewing needs.
1.2 Importance of the Operation Manual
The operation manual is essential for mastering your Singer sewing machine. It provides step-by-step instructions for setup, threading, and troubleshooting, ensuring safe and efficient use. The manual also offers maintenance tips and stitch guides, helping you optimize performance and extend the machine’s lifespan. By following the guidelines, users can avoid common issues and achieve professional results. This comprehensive guide is your key to unlocking the full potential of your Singer sewing machine.
Safety Precautions
Always turn off the machine when making adjustments. Keep fingers away from moving parts and avoid pulling fabric while stitching to ensure safe operation.
2.1 General Safety Guidelines
Always turn off the sewing machine when making adjustments or changing parts. Keep fingers away from moving components to avoid injury. Ensure loose clothing or long hair is tied back. Never let children operate the machine unsupervised. Avoid pulling or pushing fabric forcefully while stitching. Use only recommended attachments and follow instructions carefully. Maintain a clean workspace to prevent accidents. Regularly inspect the machine for wear and tear. Adhere to these guidelines to ensure safe and efficient sewing experiences with your Singer sewing machine.
2.2 Electrical Safety Tips
Plug your Singer sewing machine into a grounded electrical outlet to prevent shocks. Avoid using damaged cords or overloaded circuits. Never expose the machine to water or moisture. Keep the power switch clean and dry to ensure proper function. Disconnect the machine when not in use or during maintenance. Avoid touching electrical parts with wet hands. Use a surge protector to safeguard against power spikes. Follow these tips to maintain electrical safety and prolong the machine’s lifespan.
2.3 Handling Moving Parts Safely
Always keep fingers away from the sewing machine’s needle and moving parts. Avoid touching the needle, bobbin, or presser foot while the machine is operating. Never pull or push fabric forcefully, as this can cause accidents. Ensure the presser foot is raised before removing fabric. Keep children away from the machine when in use. Store the machine in a secure location when not in operation. These precautions help prevent injuries and ensure safe operation;
Parts and Accessories
The Singer sewing machine includes essential components like the needle, bobbin, presser foot, and stitch selector. Accessories enhance functionality, ensuring efficient and precise sewing experiences for all users.
3.1 Essential Components of the Singer Sewing Machine
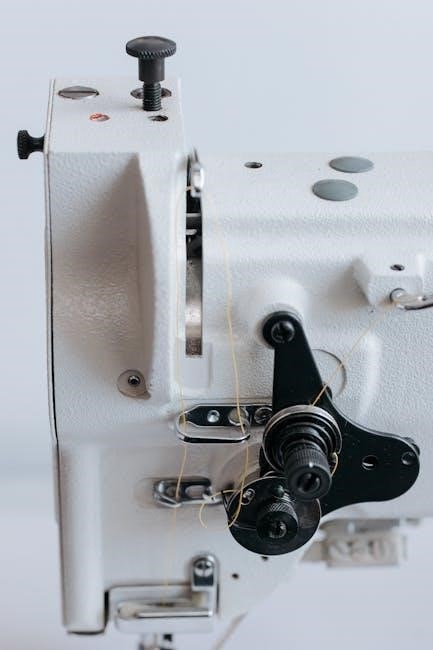
The Singer sewing machine features key components like the needle, bobbin, presser foot, and stitch selector. The needle bar, thread take-up lever, and tension dials are crucial for stitch control. The bobbin case and shuttle ensure proper thread loop formation. The presser foot helps manage fabric, while the stitch selector allows users to choose various patterns. Understanding these parts is vital for effective machine operation and achieving desired sewing results.
3.2 Accessories for Enhanced Functionality
Singer sewing machines come with a variety of accessories to enhance functionality. These include general-purpose and zipper feet for diverse fabric types, extension tables for larger projects, and quilting guides for precise stitching. Specialized needles, like heavy-duty and embroidery needles, are designed for specific tasks. Additional accessories such as bobbin cases, seam rippers, and threaders streamline the sewing process. These tools expand the machine’s capabilities, enabling users to tackle complex projects with ease and precision, ensuring professional-quality results.
Setting Up the Machine
Unpack and place the machine on a stable surface. Connect the power supply as instructed, ensuring safety and proper electrical connections before first use.
4.1 Unpacking and Initial Setup
Begin by carefully unpacking the Singer sewing machine, ensuring all components are included. Gently remove the machine from its packaging and place it on a flat surface. Inspect for any visible damage. Locate the accessories, such as bobbins, needles, and the power cord. Store items in a safe, dry area. Before plugging in, ensure all parts are accounted for and the machine is free from packaging materials. This setup step ensures a smooth start to your sewing journey.
4.2 Placing the Machine on a Stable Surface
Position the Singer sewing machine on a sturdy, flat surface, ensuring it is level and secure. Avoid uneven or shaky tables to prevent vibrations. Place the machine away from direct sunlight and moisture. Use a non-slip mat or pad to stabilize it further. Ensure the surface is clean and free from clutter to allow easy access to controls and workspace. Proper positioning enhances sewing accuracy and reduces the risk of machine damage or operational issues during use.
4.3 Connecting the Power Supply
Before connecting the power supply, ensure the Singer sewing machine is turned off. Locate the power cord and plug it into a nearby electrical outlet. Use the correct voltage adapter as specified in the manual to avoid damage. Avoid using extension cords or power strips, as they may cause voltage fluctuations. Ensure the cord is securely connected to both the machine and the outlet. Double-check the power requirements in the manual to confirm compatibility. Once connected, test the machine at a low speed to ensure proper operation.

Threading the Machine
Proper threading is essential for smooth operation. Switch the machine off, raise the take-up lever, and thread through the tension discs. Ensure the presser foot is up and guide the thread carefully through the machine’s pathway. Always refer to the manual for specific threading instructions tailored to your fabric type and stitching needs.
5.1 Step-by-Step Threading Guide
Switch off the machine and raise the take-up lever. Thread through the tension discs, ensuring it clicks into place. 2. Insert the thread into the needle bar groove, then through the needle eye. 3. Pull gently to remove slack. 4. Test by sewing a few stitches to ensure proper tension. Always follow the manual for specific threading instructions tailored to your Singer machine model.
5.2 Troubleshooting Thread Tension Issues
If stitches are uneven or fabric bunches, check thread tension. Ensure the take-up lever is at its highest point. Verify the thread path is correct and free from tangles. If issues persist, adjust the tension dial or consult the manual. Always switch off the machine before making adjustments. Avoid pulling fabric while sewing, as this can disrupt tension. For persistent problems, rethread the machine following the step-by-step guide and test on scrap fabric before starting your project.
Winding and Inserting the Bobbin
Properly wind the bobbin with the correct thread type. Insert it into the bobbin case, ensuring it seats securely. Adjust the bobbin tension as needed for smooth stitching.
6.1 Proper Bobbin Winding Techniques
Properly winding the bobbin is essential for smooth stitching. Place the bobbin on the winder, draw the thread through the guide, and wind slowly. Avoid overfilling the bobbin. Ensure the thread is evenly distributed and lies flat. Once full, cut the thread, leaving a small tail. Remove the bobbin and trim excess thread. This prevents tangles and ensures consistent tension during sewing. Always refer to the manual for specific bobbin-winding instructions tailored to your Singer model for optimal results.
6.2 Inserting the Bobbin Correctly
To insert the bobbin, lift the presser foot and open the bobbin compartment. Place the bobbin into the case, ensuring the thread unwinds counterclockwise. Gently pull the thread to seat it in the tension spring. Close the compartment and guide the thread through the machine’s tension discs. Pull the thread gently to ensure proper tension. Always follow the manual’s guidance for your specific Singer model, as slight variations may exist. Proper bobbin insertion ensures smooth stitching and prevents thread issues during sewing.
Basic Sewing Operations
Start by lifting the presser foot and placing fabric evenly. Gently guide the fabric while sewing, maintaining steady movement. Secure the final stitch by reversing or tying threads.
7.1 Starting Your First Stitch
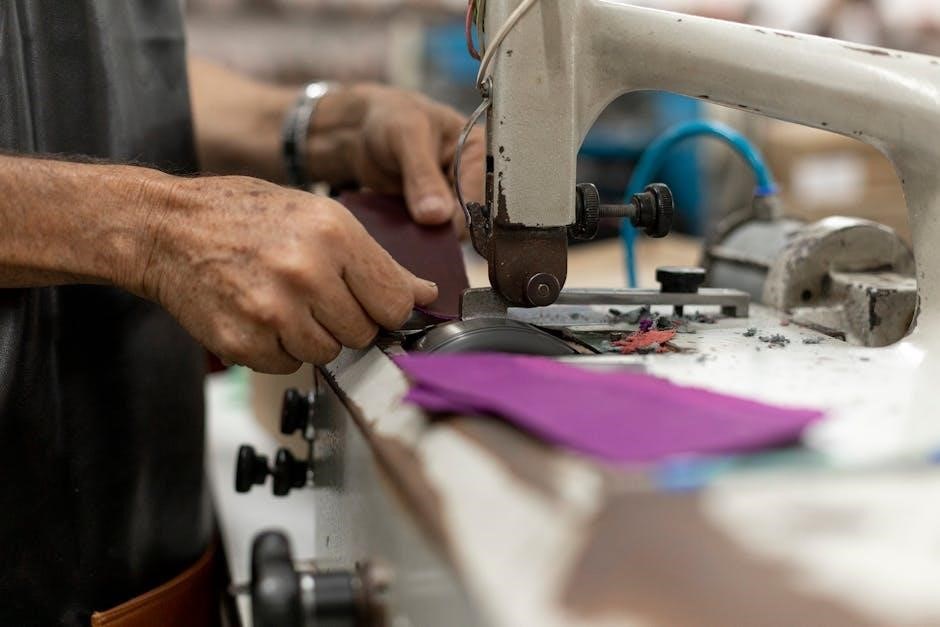
Begin by ensuring the machine is properly threaded and the bobbin is correctly inserted. Place your fabric under the presser foot, aligning it neatly. Lower the presser foot gently to secure the fabric. Turn the handwheel to position the needle at its highest point. With the needle up, press the foot pedal gently to start sewing, guiding the fabric smoothly under the needle. Keep the fabric moving steadily to create even stitches. As you sew, maintain consistent fabric movement for straight, aligned stitching.
7.2 Managing Fabric While Sewing
To manage fabric effectively while sewing, ensure proper alignment before starting. Guide the fabric smoothly, avoiding excessive pulling or pushing, which can cause uneven stitches or needle breakage. Use the presser foot to secure the fabric, adjusting its pressure for different materials. Maintain consistent fabric movement to achieve even stitching. For slippery or thick fabrics, consider using a walking foot or Teflon foot. Keep fingers away from moving parts and use the feed dogs to help move the fabric steadily. Adjust stitch settings for various fabric types to ensure optimal results. Always follow safety guidelines to prevent accidents while handling fabric near the machine. By mastering these techniques, you can achieve professional-looking seams with ease and confidence.
7.3 Securing the Final Stitch
To secure the final stitch, reverse sew at the end of the seam for a few stitches. Tie off the thread by pulling it gently and cutting it close to the fabric. Raise the take-up lever and presser foot to remove the work. For added security, backstitch at the beginning and end of the seam. Ensure the thread is tightly woven to prevent unraveling. This method ensures a strong and professional finish. Always keep fingers clear of the needle area during these steps to avoid accidents.
Stitch Selection and Adjustment
Explore stitch options using the stitch chart for various fabrics and projects. Adjust stitch length and width as needed for customizable results. Utilize the dial for precise settings.
8.1 Understanding Stitch Charts
Stitch charts are essential guides for selecting the right stitch pattern for your fabric type. They provide visual representations of various stitches, such as straight, zigzag, and decorative options. Each symbol corresponds to a specific stitch, helping you identify the best choice for your project. Refer to the chart to customize stitch length and width settings. For example, straight stitches (patterns B to E) can be fine-tuned using the dial between symbol letters. This feature allows precise control over stitch appearance and functionality. Always consult the chart for optimal results and fabric compatibility.
8.2 Adjusting Stitch Length and Width
Adjusting stitch length and width tailors your sewing to fabric type and design needs. Locate the stitch length dial or electronic controls, typically marked with plus and minus signs. For delicate fabrics, shorter lengths and narrower widths are ideal. Heavier materials may require longer stitches and wider settings. Use the dial to fine-tune, ensuring even tension. Test adjustments on scrap fabric to avoid project mishaps. Maintain consistent settings for uniform results. Adjusting these parameters enhances stitch quality and adaptability for various sewing tasks.
8.3 Customizing Stitch Patterns
The Singer sewing machine allows for creative customization of stitch patterns. Use the stitch chart provided in the manual to explore various decorative and functional stitches. Select patterns via the electronic controls or dial, depending on your machine model. Adjust stitch length and width to enhance design elements. For intricate designs, combine different patterns or use the automatic threading feature. Experiment with specialized stitches for embroidery, quilting, or heirloom sewing. Always test custom settings on scrap fabric to ensure desired results before sewing on your final project.
Maintenance and Cleaning
Regular maintenance ensures optimal performance. Clean the machine by removing lint and debris. Lubricate moving parts as specified. Schedule professional servicing annually for longevity and precision.
9.1 Regular Cleaning of the Machine
Regular cleaning is essential for maintaining your Singer sewing machine’s performance. Always switch off the machine before cleaning. Use a soft brush to remove lint and debris from the bobbin area, feed dogs, and stitch plate. Raise the presser foot to access hard-to-reach areas. Gently wipe surfaces with a dry cloth, avoiding harsh chemicals. Check for dust buildup in the tension discs and take-up lever. Clean the machine after each project to prevent lint accumulation. Proper cleaning ensures smooth operation, consistent stitch quality, and extends the machine’s lifespan.
9.2 Lubricating Moving Parts
Regular lubrication of moving parts ensures smooth operation and prevents wear. Use only Singer-recommended sewing machine oil. Apply a few drops to the bobbin hook area and any visible gears. Avoid over-lubrication, as excess oil can attract dust. Turn the handwheel gently to distribute the oil evenly. Refer to the manual for specific lubrication points. Proper lubrication maintains machine efficiency, reduces friction, and prevents mechanical issues. Clean excess oil with a dry cloth to avoid residue buildup. Lubricate every 50 hours of use or as needed.
9.4 Scheduling Professional Servicing
Professional servicing is crucial for maintaining your Singer sewing machine’s optimal performance. Schedule a service every 12 to 24 months, depending on usage. Trained technicians will clean internal mechanisms, realign components, and replace worn parts. This ensures smooth operation, prevents major repairs, and extends the machine’s lifespan. Regular professional servicing also helps maintain stitch quality and overall functionality. Always use authorized Singer service centers to guarantee genuine parts and expert care. Keep your machine in top condition by scheduling routine check-ups, ensuring years of reliable service.
Troubleshooting Common Issues
Troubleshooting common issues with your Singer sewing machine involves checking power supply, thread tension, and bobbin alignment. Consult the manual for solutions or contact a professional if problems persist.
10.1 Diagnosing Thread Breakage
Thread breakage can occur due to incorrect tension, improper threading, or using low-quality thread. Check the take-up lever and ensure it’s at the highest point. Verify the needle is correctly inserted and the bobbin is properly seated. If issues persist, consult the manual or reset the tension dials to their default settings. Regularly cleaning the machine and using Singer-recommended threads can prevent such problems.
10.2 Fixing Bobbin Tension Problems
To fix bobbin tension issues, start by ensuring the bobbin is correctly seated in the bobbin case. Adjust the small screw on the bobbin case to balance the tension. If the thread is too tight or loose, refer to the manual for specific adjustment guidelines. Clean the bobbin area to remove lint, which can disrupt tension. Use Singer-recommended threads and avoid over-tightening the bobbin. If problems persist, reset the tension dials to their default settings or consult a professional for assistance.
10.3 Resolving Motor Malfunctions
First, turn off the sewing machine and unplug it to ensure safety. Check the power cord and outlet for damage or issues. Ensure the machine is properly assembled and only Singer-approved attachments are used. Lubricate the motor according to the manual’s instructions to reduce friction. If the motor overheats, allow it to cool before resuming use. For persistent malfunctions, contact a Singer-authorized service center for professional repair. Avoid attempting complex repairs yourself to prevent further damage or safety hazards.
Advanced Features and Techniques
Explore advanced features like automatic threading and decorative stitches. Use special fabric settings for unique materials. Customize stitch patterns for personalized sewing projects and enhance creativity.
11.1 Using Automatic Threading
The Singer sewing machine features an automatic threading system, simplifying the process. Turn the machine off before threading. Use the built-in guide to thread the machine effortlessly. For models like Singer 28k, this feature ensures consistent thread tension. Always refer to the manual for specific instructions. Automatic threading saves time and reduces errors. It’s ideal for beginners and experienced sewers alike, ensuring smooth stitching every time you start a project. Regularly clean the threading area to maintain optimal performance and prevent thread breakage during sewing sessions.
11.2 Sewing with Special Fabrics
Singer sewing machines are versatile for various fabrics. For delicate materials, use a sharp needle and adjust stitch length. Heavy fabrics like denim require a heavier-duty needle and increased tension. Silk and stretch fabrics benefit from a walking foot or Teflon foot. Always stabilize fabric with backing if needed. Refer to the stitch chart for appropriate patterns. Adjusting thread tension ensures even stitching. These tips help achieve professional results, whether sewing lightweight chiffon or thick canvas. The manual provides detailed guidance for optimal fabric handling and stitch selection.
11.3 Exploring Decorative Stitch Options
The Singer sewing machine offers a variety of decorative stitches to enhance creativity. From basic straight and zigzag stitches to intricate stretch stitches, users can explore patterns for embroidery, appliqué, and more. Refer to the stitch chart for guidance on selecting and adjusting decorative stitches. Adjust stitch length and width to customize designs. Use specialty feet like the embroidery or decorative stitch foot for precision. Experiment with different thread colors and fabrics to create unique effects. This feature allows for personalization of garments, home decor, and craft projects with professional-looking results.
Proper setup, regular maintenance, and troubleshooting ensure optimal performance. Continuous learning enhances sewing skills, encouraging creativity and mastery of the Singer sewing machine operation.
12.1 Summary of Key Operating Tips
Always use the Singer sewing machine as described in the manual. Keep fingers away from moving parts and avoid pulling fabric while stitching. Properly thread the machine and adjust stitch length as needed. Regularly clean and lubricate the machine to maintain performance. Use recommended attachments and follow safety guidelines. Ensure the presser foot is up before sewing and keep the work area clear. Refer to stitch charts for pattern selection and adjust tensions for optimal results. Following these tips ensures smooth operation and extends the machine’s lifespan.
12.2 Encouragement for Continuous Learning
Continuous learning enhances your sewing skills and creativity. Explore the machine’s features, such as decorative stitches and special fabric settings, to expand your creative possibilities. Practice regularly to master various techniques and experiment with new projects. Refer to the manual for guidance on advanced features and troubleshooting. Engage with online tutorials or sewing communities for inspiration and tips. Embrace challenges and enjoy the journey of improving your sewing abilities with your Singer machine.